Tip of the Day 163: Alarms for Missing Sensors
In tip #162 we showed how alarms can be reduced from 32 to just 2. However this will not detect a sensor being disconnected. To do that you need to add some “dummy” alarms that will go to “Warning” when a sensor is missing.
The eDART’s™ phantom curve generator creates #High and #Low curves using whatever sensors it sees at each location (EOC, PST etc.; see tip # 23). It does not know what sensors are supposed to be there. So if a one of 16 sensors is missing then the phantom curves will still be valid but only include the remaining 15.
To force the eDART to discard parts if sensors are missing you add dummy alarms for all of the sensors like this:

This creates 32 alarms, an Above and Below for each. We only need one of those in the list to detect a missing sensor. To make removing half of them it a little easier, first sort by clicking on the Direction header button (works in general; see tip # 80 )

Then click and remove all of the Above rows EXCEPT the #High.
Now you have a reduced alarm list. You can put zeros into the individual alarms because you want to use the single #Low Below row to set your level for shorts or sinks on all 16. Now if a sensor is disconnected or damaged it will appear with a “Warn ?” in the Status column.
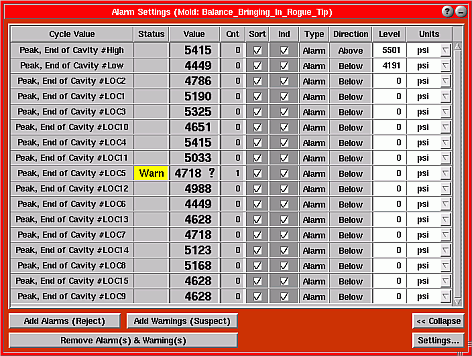
In the example above, the Diverter Controls will then turn the “Good” output off because you don’t know what is going on in LOC5. Yet any adjustments to the levels only need to be done to the two rows at the top. When you are not diagnosing missing sensors the Alarm Settings window can be reduced in size to show just the #High and #Low alarms.
Warning: The “Warning ?” will NOT turn the Sorting Output / Reject signal on. It simply turns both the Good and Reject outputs off. Therefore ensure the cavities are discarded properly with a sensor warning you must use “Fail-safe” sorting: Good output only (see tips # 1 and #2)