Tip of the Day 27: How’s the Sequencing Working? Look at the “Sequence Lights”
In my last tip (“most excellent Theopholis”) I described how a variety of inputs to the eDART (including the sequence module) create internal “Machine Sequence” signals. Before I dive into how all that is done here is a simple tip for looking at the two different sequences.
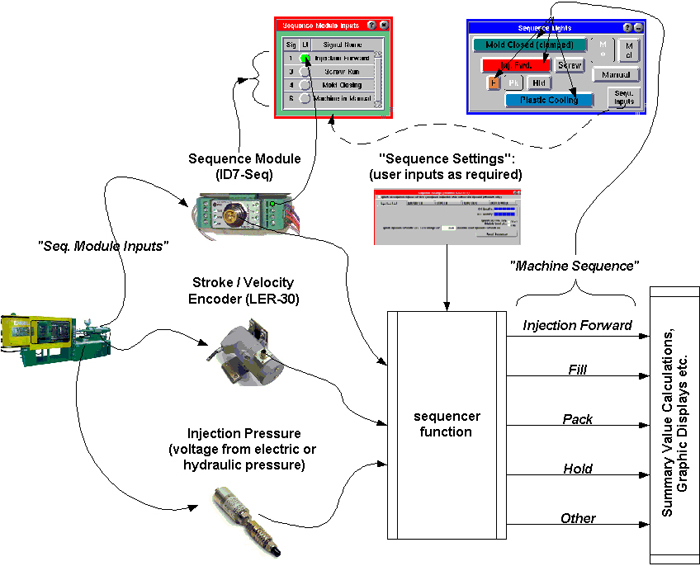
By default the “Sequence Lights” tool is “attached” to any machine that is started. So it is always running once the eDART’s job is started and all of the software is up. The main Sequence Lights panel (with the rectangular “lights”) tells you how the eDART software sees the machine sequencing. Lights in color show that the Machine Sequence internal signal is On (grey is Off). Any lights showing in just an outline (without the appearance of a three dimensional light) indicate Machine Sequence signals that the eDART cannot figure out.
If the Sequence Lights show an inactive (outlined) light or one that goes on and off at the wrong time then you may want to find out why. The first step is to click the “Seq. Lights” button. This shows a window with a list of the terminal numbers on the ID-7 sequence input module and little green lights that match the lights on the actual module (helpful when buried in the machine). If you named one of the sequence inputs “Not Used” then it will not show up in the list of terminals. These are the actual “Seq. Module Input” values coming from the machine. If one of them is misbehaving you need to open Sensor Locations (from the main menu) and name it “Not Used”. You can also call it “Unknown” if you want to put it on the Cycle Graph sequence traces and see what it is doing.
Below is an updated picture of the Sequence Inputs -> Machine Sequence diagram showing how the Sequence Lights fit in. Future tips of the day will describe how the sequencer takes the machine inputs and turns them into the internal Machine Sequence signals shown on the main pane of the Sequence Lights.